Hi,
As the frame is done, now is the time to move to the swing arm. Previously it is using the KR150B model, but has damaged because of the sprocket housing have fallen out from the wheel. The swing arm took some serious damage, and as I have a spare swing arm at my disposal, i took it to replace the molested swing arm.
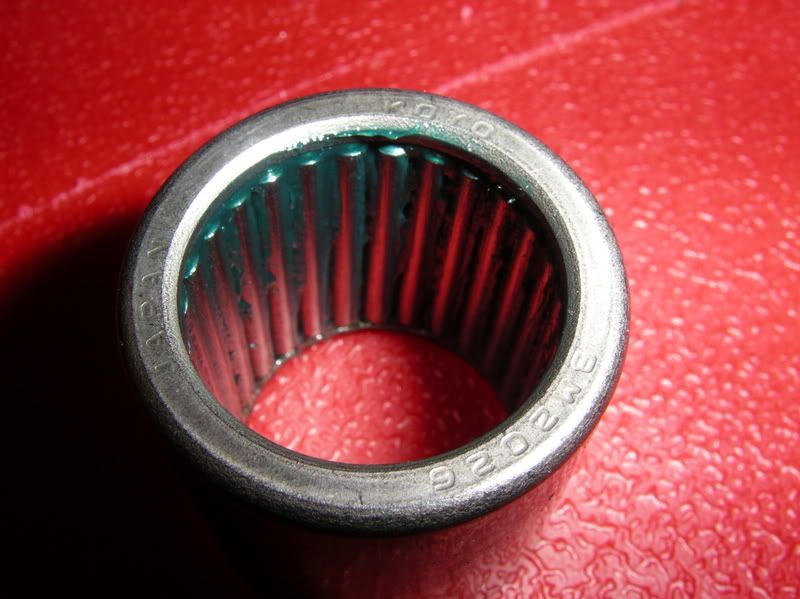
The bearing is rare as a hen's teeth! i thought looking out for a bearing was an easy task, or at least NKS Sentul would have it. It turns out the don't but id found an original swingarm bearing for it, which costs MYR90 for a piece, that's RM 180 thrown out of the window! So the next best thing is to take the bearing from my previous arm,as it still looks good.
But that is not all. After completion of painting the arm black, i found out the previous bearing is still inside, but only the outer cage. This brings the process into a screeching halt. I can't knock it out due to i don't have the correct chisel for it.
Bugger. So once again, i have to bring it to my friend's shop to grind-knock-grind-curse at it and finally it came out. So after freezing up the bearing inside the freezer, and blow torch the arm, the bearing were knocked with a light tap to put it in. Now, time to get the fork sorted out.
Weighing up
Posted by
red
on Wednesday, August 26, 2015
/
Comments: (0)
Hi,
After the frame were finished, i take some time to sort the things needs to be done. Forks, wiring, fairings, etc. And this is some the item that i measured.
Wiring only weighs 210gm ! That is not included with the plug coil yet.
the battery eliminator (capacitor) to replace the heavy battery which weighs approx. 3kg plus. However i cannot runs total-loss ignition on these.
The CDI from Phantom. It maybe changed with the IGNITECH programmable i have laying around but that is still to be decided upon how easy the programming might be.
After the frame were finished, i take some time to sort the things needs to be done. Forks, wiring, fairings, etc. And this is some the item that i measured.
Wiring only weighs 210gm ! That is not included with the plug coil yet.
the battery eliminator (capacitor) to replace the heavy battery which weighs approx. 3kg plus. However i cannot runs total-loss ignition on these.
The CDI from Phantom. It maybe changed with the IGNITECH programmable i have laying around but that is still to be decided upon how easy the programming might be.
Tapered steering bearing
Posted by
red
/
Comments: (0)
Hi,
I bought the tapered steering bearing, as i have always wanted to have this. No more chasing all over the parking lot / garage for the ball bearing. Its also wont have the notch like those retards RXZ usually have when they overtighten the steering. The hunt suppose to be taking some time, and since a guy sells it on Fb, i just make the payment because it is so much faster than sourcing one myself.
This is the picture given from the seller. I think this picture is from NSR 150 RR, the SP have slightly bigger bearing according to him.
Delivered in 1 day, this is remarkable as buying online usually takes 3 weeks to a months in these days. :(
I have installed it this morning, just before going to work. Previous bearing race was a bastid to remove. I left theses tapered one in fridge for a night, and blow gun the frame where the bearing sits for easier installation. Job;s jobbed. Next, the forks are going to have a visit. New spring, modded damper rod is in the pipeline.
I bought the tapered steering bearing, as i have always wanted to have this. No more chasing all over the parking lot / garage for the ball bearing. Its also wont have the notch like those retards RXZ usually have when they overtighten the steering. The hunt suppose to be taking some time, and since a guy sells it on Fb, i just make the payment because it is so much faster than sourcing one myself.
This is the picture given from the seller. I think this picture is from NSR 150 RR, the SP have slightly bigger bearing according to him.
Delivered in 1 day, this is remarkable as buying online usually takes 3 weeks to a months in these days. :(
I have installed it this morning, just before going to work. Previous bearing race was a bastid to remove. I left theses tapered one in fridge for a night, and blow gun the frame where the bearing sits for easier installation. Job;s jobbed. Next, the forks are going to have a visit. New spring, modded damper rod is in the pipeline.
Frame
Posted by
red
on Monday, August 17, 2015
/
Comments: (0)
Hi All,
Last week have been a productive weekend, where the Ninja 250 have finally started, but still have some minor problem that would need to be sorted but nonetheless I have done some seat time on it, and some Break-in period for the new pistons and the AFR not sorted and bla..bla...
Here is the finished frame…so glad it is flawless LOL..as compared to paint it while the engine is still on the bike. No more spot where the paint cannot reach. Next task would be painting the swing arm, as i saw 1 bike which looks great with black frame and swing arm, with white wheels.
Looks great is it?
Last week have been a productive weekend, where the Ninja 250 have finally started, but still have some minor problem that would need to be sorted but nonetheless I have done some seat time on it, and some Break-in period for the new pistons and the AFR not sorted and bla..bla...
I have managed to finalise the paint on the frame, where I have put 2 coats of Flat black and also Flat clear on top of it. I might need some more clear coat as the paint have been sold out at the shop. Note to self " 2 spray can for NSR frame", otherwise you might have to run out to get some more in the middle of the process.

Looks great is it?
Swingarm
Posted by
red
on Wednesday, August 12, 2015
/
Comments: (0)
Hi,
The swingarm (if you still remembered) is a mess. The sprocket carrier were thrown out due to a failure with the mechanic to alert on this simple task means the swingarm needs repair / replace.
I already have a same swing arm in hand, so using that one is a no-brainer.
However, it needs to be machined like this since i don't want to use the Uni-trak suspension on the bike.
The machine process was already done without the picture, and it only costs me RM 60.
Next task is to buy the swingarm chain adjuster end, new swingarm bearing and might need some machine to the frame due to the bad machining job done to it.
The swingarm (if you still remembered) is a mess. The sprocket carrier were thrown out due to a failure with the mechanic to alert on this simple task means the swingarm needs repair / replace.
I already have a same swing arm in hand, so using that one is a no-brainer.
However, it needs to be machined like this since i don't want to use the Uni-trak suspension on the bike.
The machine process was already done without the picture, and it only costs me RM 60.
Next task is to buy the swingarm chain adjuster end, new swingarm bearing and might need some machine to the frame due to the bad machining job done to it.
Frame
Posted by
red
/
Comments: (0)
Hi All,
Sorry for the late updates, i have been struggling with work, and with the Ninja250 at nights (It is sort-of-finished now, yeay!) so i haven't got time to update.
Long story short, here's the progress so far.
Cleaning years of road trash and grimes...was not a fun task!
Here i highlighted some parts that needs grinding..
..some more...
...and some more that would bore you to death if i show it all. See some parts of it is already rusted, so a rub with sandpaper and recoat them with primer.
Primer phase is now done, and the a crack showed up! This means further delay to the painting process.
It is now being done last saturday with some MIG welding, and sandpaper and primer on the affected parts.
Flat black paint was already bought yesterda, but CLear for Flat is finished..only available next week.
Sorry for the late updates, i have been struggling with work, and with the Ninja250 at nights (It is sort-of-finished now, yeay!) so i haven't got time to update.
Long story short, here's the progress so far.
Cleaning years of road trash and grimes...was not a fun task!
Here i highlighted some parts that needs grinding..
..some more...
...and some more that would bore you to death if i show it all. See some parts of it is already rusted, so a rub with sandpaper and recoat them with primer.
Primer phase is now done, and the a crack showed up! This means further delay to the painting process.
It is now being done last saturday with some MIG welding, and sandpaper and primer on the affected parts.
Flat black paint was already bought yesterda, but CLear for Flat is finished..only available next week.
Gaskets
Posted by
red
on Wednesday, July 29, 2015
/
Comments: (0)
Hi All,
As the overhaul continues, i have come towards near completion. This is the time when i need new gaskets all over. I need new gasket for Clutch cover, i can still reuse my old one but that's wrong, at least not up to the level that i bring the engine now.
But what i really need is the gasket for flywheel cover, where i didn't have any in my stock, nor it was not there last time. I have searched all over for it, but no shop keeps stock. Now i remembered back in the old days, when i couldn't find any parts for the bike. Well, some things doesn't changed much.
So, the solutions is i have to make it on my own, using the cover to make the template. (i bet you guys already knows this) The gasket material is bought a long time ago, 0.8mm gasket paper for universal usage.
I have a punch to make the holes, but since it's already late at night and i have complaints from neighbours downstairs about noises, i need to find other ways to make the holes. Paper Puncher was my bet, and it does work perfectly. How much energy needed if i use the punch, but the paper puncher makes me wonder why i bought the punch at the first place.
As the overhaul continues, i have come towards near completion. This is the time when i need new gaskets all over. I need new gasket for Clutch cover, i can still reuse my old one but that's wrong, at least not up to the level that i bring the engine now.
But what i really need is the gasket for flywheel cover, where i didn't have any in my stock, nor it was not there last time. I have searched all over for it, but no shop keeps stock. Now i remembered back in the old days, when i couldn't find any parts for the bike. Well, some things doesn't changed much.
So, the solutions is i have to make it on my own, using the cover to make the template. (i bet you guys already knows this) The gasket material is bought a long time ago, 0.8mm gasket paper for universal usage.
I have a punch to make the holes, but since it's already late at night and i have complaints from neighbours downstairs about noises, i need to find other ways to make the holes. Paper Puncher was my bet, and it does work perfectly. How much energy needed if i use the punch, but the paper puncher makes me wonder why i bought the punch at the first place.
The gasket is now completed, now i just need to re-thread back the bolt for the clutch cover, my flywheel side have been done previously. I lubed the bolts before assembly, and torque it to 10Nm configuration for all the bolts.